- Starting With The Rack
- The Brain of the System
- Why We Needed Splitters
- Making Setup Almost Foolproof
- The Front of House Loom
- Mixing Station Is Brilliant
- What It Actually Cost
- Was It Worth It?
- If You’re Thinking About Building One…
- Video walkthrough
Preparing to launch a brand new tribute show and struggling in rehearsals to get decent sound or fighting with ancient mixers not suited to today’s modern show demands, I took the plunge and decided to set about building our own in house IEM control rack. I’ll be honest,building an IEM rack wasn’t something I ever thought I’d be doing, but with so much time wasted troubleshooting issues and struggling to get good sound I decided it was time to get my hands dirty.
Like a lot of bands, we’d spent years turning up to gigs and rehearsals, plugging into whatever monitor system was available and hoping for the best. Some nights were brilliant, when everything clicked and the sound was on point. Other nights you’d spend ages back and forward with the sound engineer, asking for “more vocals… less guitar… actually, can I have more kick?” By the time everyone was happy (assuming you actually got to that point), everyone was frustrated and it was time to open the doors.
The more videos I watched and other working musicians I spoke to that had built their own systems, the more I realised that building our own rack wasn’t nearly as complicated as I’d imagined. It was simply just a case of understanding how all the pieces fitted together.
So that’s exactly what I did.
Starting With The Rack
The first thing we bought was a lightweight 6U flight case.
Nothing fancy. I didn’t need something that looked impressive or cost thousands and required a degree in sound engineering to work, I needed something that could survive being thrown in and out of the van every weekend and just WORKED.
From the start, the goal was to keep everything permanently wired inside the case. I didn’t want to spend twenty minutes reconnecting cables at every venue and rehearsal. I wanted to turn up, plug in and get on with playing.
The Brain of the System
After a lot of research and recommendations from other musicians, I settled on a second-hand Behringer XR18. While there are newer, all singing and dancing units available, the XR18s hold their own despite them being released over 12 years ago. There’s a reason so many musicians recommend it. It’s affordable, incredibly flexible and seems to hold its value really well if you ever decide to sell it on (Originally sold for around £540, 12 years on they still sell second hand for £300-£400).
The XR18 on its own is capable of handling all of our in-ear mixes and front of house sound meaning everyone in the band can have exactly what they want in their ears. More vocals? No problem. Less click? Easy. Everyone gets their own mix instead of trying to make one wedge monitor work for five people.
One thing I learnt quite quickly, though, was not to rely on the built-in Wi-Fi.
It works fine at home, but venues are packed with wireless networks, phones and other equipment competing for signal. Rather than risk losing connection halfway through a gig, I picked up a cheap 5GHz router for about a fiver, connected it with a short Cat5 cable and it’s been rock solid ever since. Sometimes the cheapest upgrades make the biggest difference.
Why We Needed Splitters
This was probably the part that confused me the most before I started building the rack.
The idea is actually really simple. Every microphone, input and instrument gets plugged into the front of the MS8000 splitters first. From the back of the splitters, each signal gets split in two.
Output 1 goes into our XR18 so we can build our own monitor mixes.
Output 2 goes to Front of House so the engineer has complete control over what the audience hears.
That means we’re not fighting over the same mixer, and nobody has to compromise. We hear exactly what we want on stage while the engineer can mix the room however they need to.
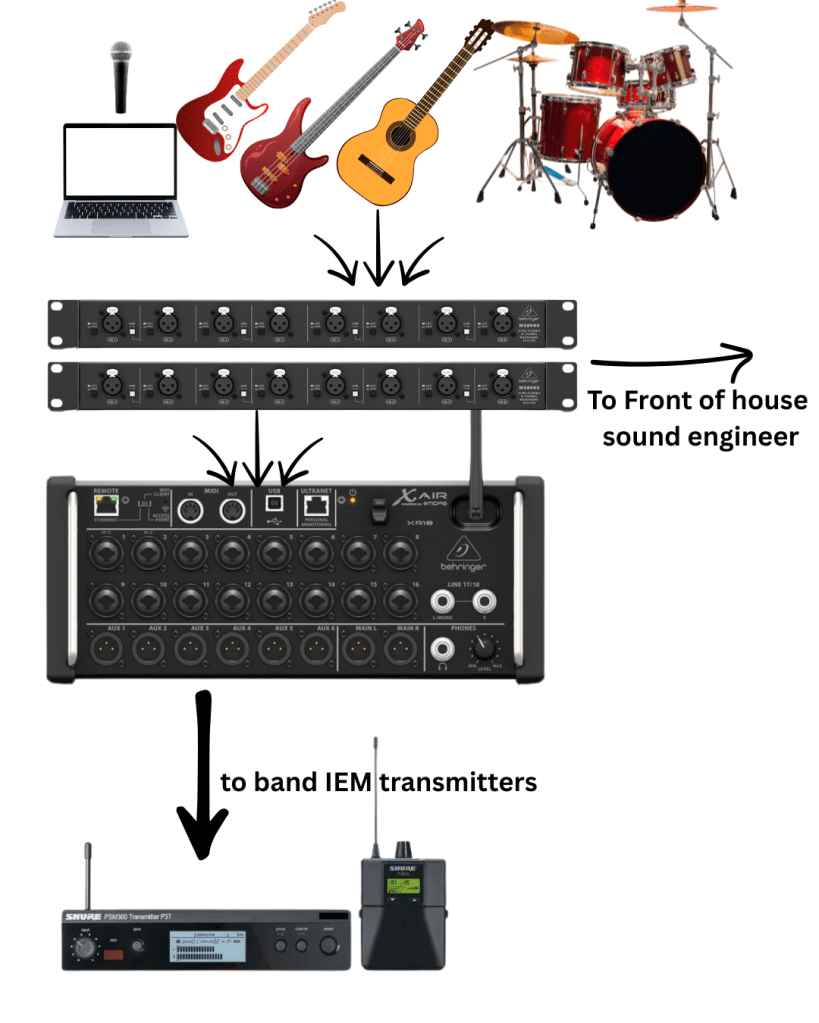
Once I understood that, everything else started to make sense.
Making Setup Almost Foolproof
One thing I wanted was to make setup as simple as possible. Every output is labelled, every cable stays connected. Nothing gets unplugged between gigs unless it absolutely has to.
At the back of the rack there’s a single power strip feeding everything, so instead of plugging in five or six separate power supplies, there’s just one mains lead.
I even mounted the router with Velcro so it’s secure but easy to replace if it ever dies.
It’s not glamorous, but it’s simple and that’s what matters when you’ve got twenty minutes to load in.
The Front of House Loom
Instead of handing a sound engineer a mess of sixteen individual 5m XLR cables and explaining what each one is, we simply hand over one labelled loom along with our input list.
Every channel is already labelled, the engineer plugs it into the stage box in whatever order they need and they’re ready to go. Meanwhile, we connect our instruments to the front of the rack, open Mixing Station on our phones and sort out our own monitor mixes.
No confusion and no cable spaghetti to untangle wondering where Channel 7 has disappeared to.
Mixing Station Is Brilliant
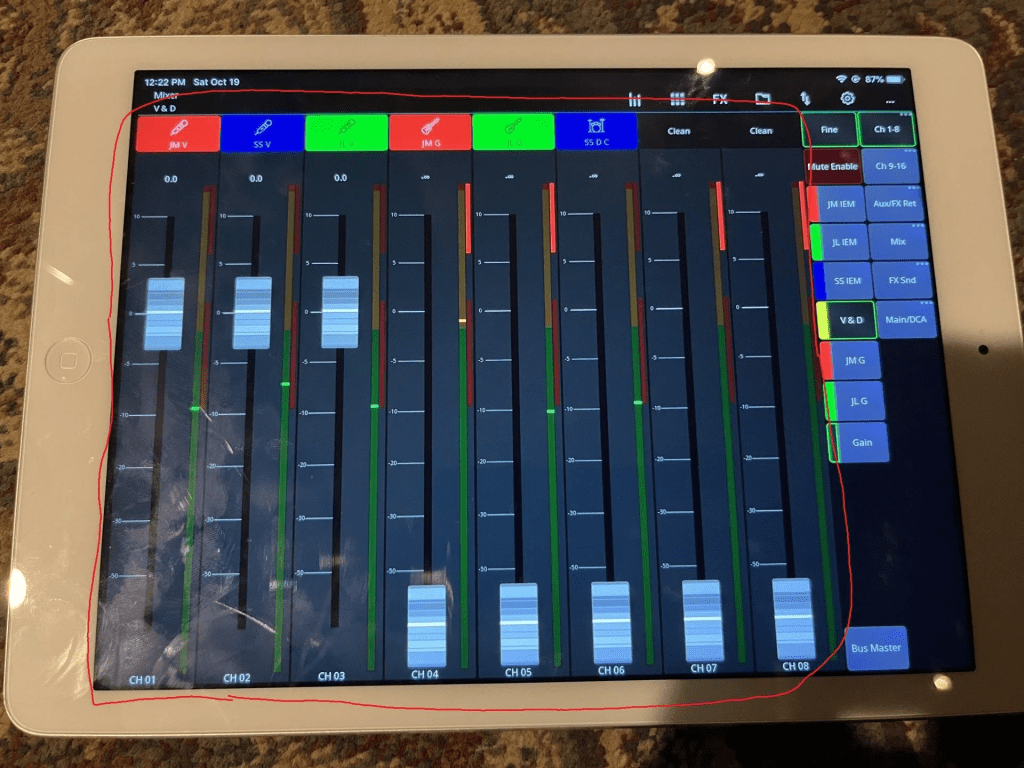
I know Behringer has its own app (MX-Q) but after trying both, I still prefer the tried and tested Mixing station app which is available for phone or tablet. I’ve used it with other bands, but expected the MX-Q app to be better with it being Behringer’s own app. Sadly, it wasn’t.
It’s a bit more clear to use, quicker to navigate and just feels like it was designed by people who actually have to use these mixers every week. You do have to purchase a license for your mixer (Think the XR18 one was £5?). For anyone building an XR18 rig, I’d recommend downloading it straight away rather than using the MX-Q app. The main selling point is that it’s a LOT harder to accidentally adjust the main mix on mixing station, as you’re assigned and logged into your BUS (your IEM channel) automatically rather than it defaulting to the main mix like on MX-Q.
What It Actually Cost
One thing that surprised me during the build was how quickly all the little costs add up.
The XR18 and the custom loom from Seismic Audio were the biggest hits financially, but when you add up the case, splitters, rack accessories, XLR cables, power strip and all the bits you don’t really think about until you’re ordering them it quickly adds up.
BUT. Could I have bought a ready-made rack? Sure.
Would it have cost a lot more? Definitely.
Cost breakdown
| Behringer XR18 | £340 inc delivery | Ebay | Second hand |
| Behringer MS8000 XLR splitter x 2 | £65 inc delivery | Andertons | New |
| 16 channel XLR multicore loom cable | £240 inc international delivery | Seismic Audio via Amazon | New |
| 16 x 1m XLR cables | £70 inc delivery | Amazon | New |
| TP Link Archer 5G router | £8 inc delivery | Vinted | Second hand |
| Rack Powerbar | £10 inc delivery | Vinted | Second hand |
| Recessed XR18 rack ears | £35 including delivery | Ebay | New |
| 6U rack flight case | £75 inc delivery | Gear4music | New |
| Mixing station license | £5 | in app purchase | |
| Total Build Cost | £848 |
Was It Worth It?
Without question. Building it ourselves also meant I understood exactly how everything worked. If something ever stops working at a gig, I’ve got a much better chance of fixing it because I know how every cable is connected. We’ve already used the rack in rehearsals, promo recordings and it’s set up and ready for our live shows. Our sound engineer has used it, and also recommends them for general live shows which to be is as good a recommendation as you’ll get.
If You’re Thinking About Building One…
Don’t let it intimidate you. I definitely wasn’t an expert when I started this project. I watched videos, read forums, asked questions and figured things out as I went along. For me personally, that’s half the fun. Every band’s requirements are different, so your rack won’t look exactly like ours, but don’t be afraid to have a go. Start with a plan, buy the essentials, take your time and don’t be afraid to learn as you go.
If this build has taught me anything, it’s that putting together your own IEM rack is far more achievable than most musicians think. And once you’ve played a few gigs with a consistent monitor mix every night, you’ll wonder why you didn’t do it years ago.

